Monday, August 29, 2011

Dangerous Doodle Video Tutorial - 'Deep in the Jungle'.

Here's a bit of Jungly fun for you!  Create a tangled jungle pattern with this new Dangerous Doodle tutorial called 'Deep in the Jungle'.  I have made it pretty simple for everyone to follow, but you are welcome to get complicated and tangle those vines as much as your heart desires. 

Click on the video below.  Looking forward to your comments.  Enjoy!


Regards,


P.S: (You are welcome to use the 'Dangerous Doodle' pattern designs in any of your own creations, as I have provided them for free, however I would really appreciate it if you have the chance to link back to my articles so that others could share the doodly fun!  Thanks :))

Another Dangerous Doodle - 'Spikies' - Pattern Tutorial Video

Ta-daaaah! A new 'Dangerous Doodle' pattern tutorial.  I am really enjoying making these.  Can't wait to see what you think of this one.  If you use it in your drawing, I would love to see it.  Send me a link to your blog or just send me a pikkie.

I'm thinking of running some sort of competition where people submit drawings they have done using some of my patterns.  It's in my head at the moment, but I will post a competition soon, so don't forget to subscribe so you don't miss out on any news!


Happy doodling!
Regards,


P.S: (You are welcome to use the 'Dangerous Doodle' pattern designs in any of your own creations, as I have provided them for free, however I would really appreciate it if you have the chance to link back to my articles so that others could share the doodly fun!  Thanks :))

Saturday, August 27, 2011

My Little Tree Logo in Andrea Joseph's Hand Drawn Classifieds

My classified ad in Andrea Joseph's zine
(to be released soon) hand drawn by
Andrea herself.  Can you find  my tree logo?
Click on the image to see the small details.
There is one art blog on my list which I always get excited about when I see a new post, and that is Andrea Joseph's Sketchblog.  Andrea is a British illustrator who creates beautifully soft sketches with the most amazing minute details, often using her favourite medium of the humble ballpoint pen. Her subjects are often the everyday objects which you might not usually give a second glance, but with her drawings she helps us to appreciate the interesting shapes and textures around us that we take for granted.

She has deservedly gathered quite a following from around the world, this is evident if you take a look at comments on her blog, her flickr photostream, and various other places which she posts her artwork. Her zines are purchased by around 1000 people.

One of my favourite pieces that Andrea has created has to be her zine 'How to Draw Like a Nut'.  It is clever and funny, and displays her talent so well, in addition to giving away some of her great drawing secrets and tips.  It is a great encouragement to those who would like to be inspired to improve their drawing, and I would highly recommend it.  It is a real bargain price, too!

So when Andrea posted on her blog that she was making a classified section in her next zine (to be released soon), and that she would personally draw each ad by hand (at a very low price for the work involved) I just had to get a space.

I chose to include my little tree logo which is a recurring theme in my artwork (this comes from my drawing 'Earthed' which you can read about here).  Andrea did a wonderful job of drawing it in her own style, and of course included 'Miraculous Mosquito' and my blog address in that groovy typography that she does so well...Thanks, Andrea!

At the time of writing this post, there were still some spaces left in the classifieds of her Zine, so if you want one, check it out and get in quick, because they won't last long.

Regards,


A Dangerous Doodle: 'Over and Under'

Building up layers is a great way to give perspective to your artwork.  Make the top layers bigger than the bottom ones, and voila! You have instant perspective...because we all know that things look smaller as they get further away. 

My 5 year old daughter and 3 year old son were mesmerised by the idea that things look smaller far away but are really the same size as the same object close up.  I guess it is something we understand but take for granted as grown ups. 

Anyway, here is a Dangerous Doodle tutorial for you called 'Over and Under'.  I have made it fairly simple, but you could easily embellish this with more shading, colours, and patterns to make it your own.  The sky is the limit! 

Join the Dangerous Doodles Flickr Group.
How can this be a dangerous doodle, I hear you ask?  Well just be careful not to get caught up in those vines or fall through the spaces as you draw...doodling can be a risky business, you know!


I can't wait to see what you come up with!  Don't forget to subscribe so you don't miss the next tutorial, and please share this article with all your doodler friends :)
Send me your doodles at miraculousmosquito (at) gmail (dot) com.

Have fun!
Regards,


P.S: (You are welcome to use the 'Dangerous Doodle' pattern designs in any of your own creations, as I have provided them for free, however I would really appreciate it if you have the chance to link back to my articles so that others could share the doodly fun!  Thanks :))

Friday, August 26, 2011

Get Ready For...Dangerous Doodles!

Well to be exact, these doodles are not exactly dangerous, but we all love a bit of alliteration now and again, don't we?  I had to think of something dramatic to get your attention! 

This first video might not be dangerous, but don't eat too much before you watch it...there are a lot of wavy lines.  Hence the name 'Sea Sick'.

Some of my YouTube subscribers have commented that my drawing videos are a tad too fast for them to follow, so I have come up with a series of pattern drawing tutorial videos which are a bit more simple and straight to the point.  That way people can use the designs to adapt to their own artwork, and whatever shapes they want to fill. 

I have named them my 'Dangerous Doodles' Pattern tutorial series, and I hope you like them.  Let me know what you think in the comments below this post, or under the video itself on YouTube.


 If you would like to have a go at drawing these patterns yourself, don't forget to use the pause button if you want more time to think about each line and shape before you put it down on paper.  Don't get too caught up in trying to make your drawing look exactly like mine.  The idea is that you express the lines and shapes in your own way.  After all, we all think differently and hold our pens differently, so no two drawings are ever going to turn out the same...that's what makes art so interesting!  Just relax, go with the flow, and overall make sure that you enjoy what you are doing. 

Use different colours and materials.  You don't have to stick with ink.  Try a thin paintbrush with some different coloured inks, coloured pencils, aquarelles (water colour pencils),  or whatever takes your fancy.

Made a mistake?  Fantastic!  There is no such thing as a mistake in this sort of drawing, in fact mistakes are a great way to come up with a new pattern or idea for another artwork.  Just draw around or over it and turn it into a masterpiece.  After all, no one will ever know that it was a mistake except you....shhh!

I have so many more ideas for these tutorials, and have already recorded about eight of them so far, I just have to edit them, and hey presto!  So make sure you subscribe to my blog and youtube channel so you don't miss a thing.

If you use any of the patterns in your artwork, I would love to see it, and maybe post it on this blog to inspire others.  You can send it to me at miraculousmosquito (at) gmail (dot) com.

Have a great day (or night, depending on where you are on the Earth!)
Regards,


P.S: (You are welcome to use the 'Dangerous Doodle' pattern designs in any of your own creations, as I have provided them for free, however I would really appreciate it if you have the chance to link back to my articles so that others could share the doodly fun!  Thanks :))

Mystery Drawing Makeover - A New Video.


A new drawing video - this time a screen recording in Photoshop.  You can read more about this drawing at my previous post here.

Regards,


Sunday, August 21, 2011

Wonky...But Working on it.


Ok,so now it's pretty obvious I am desperate for ideas.  The cartoony looking pencil on the title of my blog is starting to annoy me so I drew this one instead. The end is a bit wonky but I'm working on it. I'm happy with that sharp point, though.  It has been sharpened to within an inch of its life.  Thinking of getting rid of the cartoony pencil and replacing it with this more serious pointy one.  I mean who takes cartoony pencils seriously?  My blog has identity confusion...should it be fun and groovy, or professional and serious? What has that got to do with the price of fish?

I should really post something more meaningful, like a useful tutorial.  But I can't think of one.  I actually started one last night in Photoshop, showing how to draw leaves but before I could write any instructions, I got carried away and it turned into this:


This was drawn with the Wacom Intuos tablet in Photoshop.  I enjoyed fiddling with the colours and scale of the leaves.  Not sure what to turn this into yet, but I will keep it in my little 'miscellaneous drawings' folder and bring it out when I need inspiration.  For now, I will call this 'Leaves Curl In Autumn'.  How's that sound?

Speaking of tutorials, does anyone have any requests?

Happy creating
Regards,


Saturday, August 20, 2011

Treasured Twice...How Nice!


Wow...featured in two Etsy Treasuries in 24 hours.  I'm on a roll!  Good to know my little old Etsy shop hasn't been totally buried under the millions of items people list every day, and my items can still be found...now if only someone would actually BUY something! LOL:)


You can find the actual treasuries here:

'It's Right There in Black and White'
and
'It's a Slice of Heaven - A Very Kiwi Treasury'

Spot the Miraculous Mosquito, I'm in there somewhere! 

I love some of the other items.  My favourite would have to be Nigella by 'Retrofemme', another Kiwi (New Zealand) Etsy shop owner.

Hope you're having a good one...
Regards


Thursday, August 18, 2011

Illuminated 'M' Print...and more to come.


 I'm pleased to announce that the first of my Illuminated letters, the grand letter 'M', is now available in my shop, as a brand spanking new print, to be framed and displayed wherever your heart desires.  I really enjoyed working on this piece, so I aim to draw more of the alphabet...maybe I will start with the letter 'A' just to be logical this time.  Don't forget to subscribe so that you don't miss out on any new additions.

You can read more about the illuminated letter here.

Regards,


New Print in the Shop


Introducing the new print in my shop:  'Earthed'. 
Purchase your shiny new copy, signed by me, right here

Regards,


Tuesday, August 16, 2011

Winter in Wellywood

The other day I glanced out of the window and noticed some white things drifting upwards.  At first I thought perhaps someone was outside blowing bubbles.  Then I remembered the weather forecaster had said that it might snow in Wellington that day...but of course I didn't believe him at the time.

What would he know? It hardly ever snows in Wellington.  It gets cold and windy (the unofficial name of Wellington is 'Windy Wellington' - I once read an article in the newspaper where the author stated 'only fools and tourists try to use an umbrella in Wellington') and the rain sometimes goes from left to right instead of down, and sometimes you have to hold on to things to stay upright, but never SNOW!

Children play in the snow, Wellington, New Zealand, August 2011.
We sometimes get a glimpse of snow up high on the mountains which surround Wellington, but it never makes it down to the suburbs. If you feel like getting your skis on in winter, you usually have to head for somewhere like Mt Ruapehu (nothing like skiing on a live volcano to keep you warm and toasty!)

So when I realised that they were not bubbles, but very light snowflakes being whisked up by the wind, I shouted to the kids and we all rushed outside to have a look. It was amazing, fluffy, soft, and beautiful, and it drifted on to the roofs, the trees, the cars and the roads and made everything suddenly quiet and mysterious.  It was almost time for sunset, and everything turned a romantic shade of wintery blue, contrasting with the golden lights shining out of people's windows.  Smoke curled cosily out of chimneys into the cold air, and we could hear children (and adults too) screaming with excitement as they rushed out to have a look.  It was like something out of one of those holiday cards you get covered in glitter.

Ok, I can feel this post getting just a little cheesy and emotional, so I think i'd better go ahead and show you some more photos.  Enjoy!


The native forest covered in a layer of snow, Wellington New Zealand, 2011.

The snowy scene we woke to this morning. 
Looking out towards Jonnsonville, Wellington, New Zealand, 2011.

Light and fluffy snow in Wellington, New Zealand, 2011

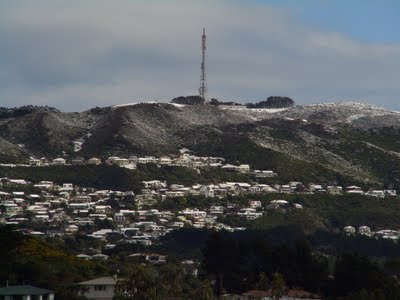
Looking out towards the tower over Johnsonville, Wellington New Zealand, 2011.


I know some of you who live in really cold countries are looking at the pictures thinking 'Snow?  That's just a sprinkling of fluff!' .  Ok, I know it doesn't look like much, but in a place where I think the last snowfall to sea-level was 15-20 years ago (correct me if I'm wrong), you can kind of see why we all got a little over-excited hehe.

Actually, today it snowed again, and it was seriously heavy, a proper blizzard, where the snowflakes smack you in the face. Trust me, I'm not exaggerating.  I made the mistake of going out for a walk in it (we live quite high above sea-level and got the worst of it) and I was like a block of ice when I got back, all white on one side.

Remind me next time, when the snow starts falling lightly, not to think 'ohh...it's a winter wonderland, how lovely'.  Because of my lack of snow experience, I failed to realise that it would turn into a proper snow storm.  One smart-Alec guy driving down the road saw me, stopped his car, rolled down the window and shouted 'You're mad!  Go home!' in a joking sort of way.

I must say I had to agree with him.  It was a mad thing to do, but totally worth it ;)
Here is a really nice video I just found which shows how the snow caught people by surprise.  A pretty good little film made in such quick time!


Snow on Cuba Mall in central Wellington (HD) from Ro Tierney on Vimeo.

Don't forget to share and subscribe!
Stay Warm!
Regards,

Friday, August 12, 2011

Miraculous Mosquito Art Prints...Coming Soon!

Today I decided to hop down to the printers and order a few A4 sized examples of my artwork on different thicknesses of silky smooth paper - 'Earthed', 'Illuminated M', and 'Chinese Proverb'. I was really pleased with the result, and thinking of selling these in my shop.

Update:  You can now purchase this print here.
Next job will be to visit good ol' New Zealand Post and find out how much they will cost to send to different international locations.  It's very exciting to see my artwork printed out so nicely.  Can't wait until I can list them properly in my shop and start sending them worldwide!

I might have a go at making some cards and other stationary as well...I think the print shop will be seeing a lot more of me in the future.

Comments?  Suggestions?  I would love to hear what you think :)

Regards,
MM.

Tuesday, August 9, 2011

Mystery Drawing Makeover

First 'Mystery Drawing' Clue - Before.

First 'Mystery Drawing' Clue - After.
 The other day we did a bit of a cleanup around the house, and out popped an old drawing I had done about a year ago, using coloured pencil on good quality cartridge paper.  It was half finished, and I remember feeling a bit bored with it and that is why I hadn't gone any further.  It's amazing what a bit of time can do, though, and I felt motivated to bring it back to life.  It is quite a detailed one, with many different sections and scenes, and it will take me a while to do, so I thought it might be fun to turn it into a 'Mystery Drawing' series.  In other words, instead of waiting until it is finished and then posting it for you to see (who knows how long it will take??), I thought I would make things more interesting and only post small sections at a time, showing the before and after.  The way I am reworking it is to scan it and open in Photoshop, and then use the drawing tablet and paintbrush tool to recolour it by hand, making it look as much like coloured pencil as possible.  Here is the first 'clue' to the Mystery Drawing.  Feel free to comment...can you guess what the drawing will look like?

You can catch me working on this artwork at my You Tube channel.

Regards,

Monday, August 8, 2011

It's Alive!


I just HAD to share this animation with you.  It is a beautifully animated drawing, which grows little by little each second.  Made by an artist known as Sandra, from Estonia.

Imagine how many hours of work this took.  If you look carefully, the artist has even made sure that the petals on each flower grow out at exactly the same time. 

I think this is drawn by hand on paper, in simple black and white...so effective.  The flowers have a sort of retro look to them which I thought was interesting. 

At the time of this post, the video only had 104 views, and had only been uploaded four days ago on YouTube.  I think it deserves more attention, so that is another reason I am showing you.  If you like it, why don't you share it too?  

Regards,
MM.

Saturday, August 6, 2011

In The Depths of the Earth - Underground Rock Pattern Drawing Tutorial


An enlarged section of 'Illuminated M' - Ink drawing.
Natural patterns can really add beauty to a design.  Organic shapes and textures bring your artwork to life, because they are not predictable.  A pattern which I use often in my own work is rocks, which can be used in many ways.  For example, an underground 'cut earth' look, or an old stone wall. 
On the left is an enlarged portion of an ink drawing I recently finished. If you want, you can read more about it here.  I have used the rock pattern to add a bit of interesting texture.

THE BASIC PATTERN

It is easy to draw your own rock pattern, if you follow these simple steps.


STEP ONE
Draw a general oval shape, but make sure you add a few flat sides.  You can make it as sharp or as smooth as you want, depending on what sort of rocks you want.


STEP TWO
Choose one of the flat sides of the first rock, and draw the next rock close against it.


 STEP THREE
 Continue to draw a few rocks in the same way.  Make sure you vary the shape and size of each rock...


 ...until you have an interesting pattern.


SHADING THE ROCKS
STEP FOUR
Now that we have the basic pattern done, we can begin to add the shading.  This is what makes the rocks look 3-Dimensional.

Choose a rock, and draw some lines on one side of it.  This is sometimes known as 'hatching'.  Try and follow the shape of the rock.


 STEP FIVE
Draw some more hatching lines in the same place, but change your direction slightly.  Do this a few times until you think it looks good...


 ... and don't be afraid to draw really dark close to the edge...now it's really beginning to look like a 3D rock!


STEP SIX
Now you're an expert!  Go ahead and shade all the rocks, making sure that your shading is on the same side on every one.  
Click on image above to enlarge.
DRAWING THE EARTH

Each rock will be surrounded by earth, so now we need to add a bit of cross-hatching in between.  The rocks need to look as though they are sitting on something, instead of just floating in mid-air.

Just like we did with the rock surface,  hatch in one direction, then in the other. Remember, it is dirt, so you can be as messy as you like with this bit!  Hatch in many different directions to show lots of texture.


Give your drawing a once-over with a bit more darkness, especially in the areas closer to the rocks.  This adds a bit more depth to your drawing, and helps make the rocks look more three-dimensional.
Add a few wiggly cracks here and there to make your rocks look authentic.  They have been underground for thousands of years, after all!


You are now ready to use your new rock drawing skills to create a bit of fancy artwork!  Add tree roots, fossils, insects, or even ant tunnels.  Experiment with pencil, pen, paint, colour.....have fun!
'Illuminated M', by Miraculous Mosquito, which features the rock pattern technique.  Go here to read more about it.  Go here to purchase a print of this artwork.
If you enjoyed this tutorial, don't forget to comment, share and subscribe.  More coming soon!

Did you use this tutorial in your artwork?  Please show me, I would love to see it:)
Have a suggestion for a drawing tutorial?  Let me know in the comments below.

Regards,
MM.


Monday, August 1, 2011

Miraculous Mosquito's photostream

'That'll Be One Dollar, Please.'Anyone Ear That?Flora with Attitude.Moroccan Teapot.Coffee Plunger.Scribbler Quilt Idea
Heart Treevase of flowers Ink DrawingTree Drawn in 'Scribbler Too'Fancy Teacup DrawingLandscape Collage Experiment - Work In Progress.Spider Flower Drawing in Black and White
Tree with Soft BackgroundTree with Scribble BackgroundThree Trees on a Hill'Earthed' - Work in Progress.I Love No Leafless Land.illuminated letter M
Strawberry Calendar 2011Heart Wrapper and Topper for CupcakesTeapot TopperTeapot Wrapper and Topper for CupcakesMy Happy Flower Colouring Book Front CoverThree Trees Card
You can check out more of my artwork at my Flickr account:)
Regards, MM.
PS: (Don't forget to SUBSCRIBE :)) 
Related Posts Plugin for WordPress, Blogger...